Today we would like to share how to sync your iPhone 6, 6 Plus, 6s, iPad Air, Mini, iPod with iTunes more easier. To transfer musics or photos from iPhone and iPad, We used to use a cable to connect iPhone and iPad to Macbook or PC, but if you connect them over Wi-Fi, you don’t have to use a cable when you are connecting your iPhone and iPad to iTunes. When your iPhone or iPad and Macbook or PC are on the same network, they are automatically connected by Wi-Fi. Now you don’t have to use a cable anymore to connect your iPhone or iPad to a Macbook or PC. Please follow the instruction step by step.
Step 01. We need you to prepare a cable only for the first time to configure Wi-Fi settings. Please connect your iPhone or iPad to your Macbook or Windows based PC using a cable. > If you connect your iPhone, Plesae launch iTunes.
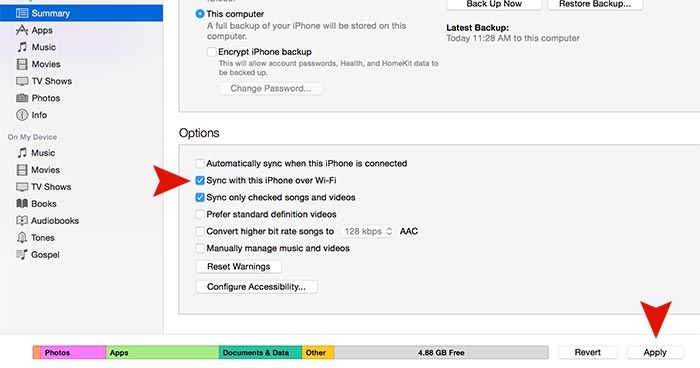
Step 02. Scroll down to Options. Try to check the box to Sync with this iPhone over Wi-Fi and then click Apply or Sync. Next time connecting your iPhone or iPad, it will be automatically connected. (Note. Your iPhone & iPad and Macbook & PC must be connected on the same network to work properly.)
Automatically Sync when this iPhone is connected: As it says, It will be automatically synced when your iPhone or iPad is connected.
Sync with this iPhone over Wi-Fi: It makes your iPhone or iPad to be connected through Wi-Fi (without a cable).
Sync Only Checked songs and videos: If you check this box, you can select musics and videos that you want to transfer.
Step 03. Can’t sync? If it’s not working properly even if you make the right settings, Please try the following options.
- Please try to disconnect and re-connect Wi-Fi on your iPhone & iPad and Macbook & PC.
- Try to restart iPhone & iPad and Macbook & PC.
- Try to update to latest version of iTunes.
- Try to use the iPhone or iPad original cable


You still need to use a cable. All iOS devices (except iPhone X) MUST be plugged in and charging in order for Wi-Fi sync to take place. The title is misleading.
If you are having problems with Wi-Fi sync, ensure your network connection type is “Home” or “Work”, and your firewall has TCP ports 123 and 3689, and UDP ports 123 and 5353 are open. Additionally, iTunes must be open on your computer for Wi-Fi sync to work.